Introduction
In order to create the map of a zone you need to create an editable image of the shape of the zone and its contents. EQ2 provides a powerful command, /loc, which displays your character's current in-game X, Z, and Y coordinates. You can move your character around the edges and shapes of a zone, collecting these in-game coordinates in your log file. Your log file can then be parsed by a tool, Mapper2, which will transform them into an editable vector graphic.
Planning
Before you begin collecting the coordinates that will make up your map, you should take a moment to carefully plan your process. Having all the right pieces in place can make a big difference in how much time you have to collect coordinates and the quality of your resulting map.
Character
Make sure you have a high enough level character for the zone you are mapping. Ideally you will gray out the zone. It is helpful to have a character with invisibility and 'Escape' skills. If it is a max level zone, you may wish to bring friends or organize a raid. Try to plan it so you won't have to fight at all, just map.
In order to map Sanctum of Scaleborn, I organized a guild raid to keep the area around my character free of hostiles while I ran around the outlines of the zone. In raid zones I was frequently able to stay after a raid to do the mapping without inconveniencing anyone else.
Access
Do you have in and out access to the zone? Is it timed entry or re-entry? Are there portions of the map that can only be accessed once, or have a "point of no return", like the drop-off at the bottom of Solusek's Eye? Make sure you have an entire area before moving on to the next.
Know the Zone
This almost goes without saying, but you should be familiar with the zone before you try and map it. If the map has multiple levels, plan where you will break the map between levels, either using the '/em mapgroup' command, or by switching out your log file (see additional discussion about this below).
Understanding How Mapper2 Works
Mapper2 works by parsing your log file for the results of the /loc command and transforming those coordinates into a Scalable Vector Graphics (SVG) file. It uses regular expressions to pull coordinates and commands from the file. Mapper2 automatically transforms the in-game coordinates to create a scaled and centered image, which is output in SVG format. You can view the Perl source code for Mapper2.exe in the \source\ subdirectory of your Mapper2 install.
Connect The Dots
In order to draw points, first click your "start a new line" macro, then click your /loc macro for each point you wish to capture. When you are capturing coordinate using your /loc macro, you are basically creating a connect the dots puzzle. Remember, you are collecting the dots, not drawing the lines.
This is an important distinction because in order to draw a box you need five points, not four. You will identify the four corners of the box, then you need a fifth point, back where you started, to close that box. See Figure 2.1 for an illustration.
In order to start a new "connect-the-dots", you must issue the /em start a new line command, which instructs the Mapper tool to not draw a line between the point you just captured and and the next point you capture. For example, if you outlined the edges of the zone you were in, you might start a new line to grab a free standing pillar in the middle of that area.
Capturing good /locs
Corners are our friends
The best place to capture a /loc is an inside corner. By moving your character as far as it will go into a corner you are guaranteed to have the furthest in two directions that you can move. This becomes important later as you clean up your lines. Corners will be the anchor points against which you can align the rest of your lines.
Outside corners are more troublesome. They are sort of slippery with no clear edge. It is common to see columns come out looking slightly wedge shaped, rather than square or rectangular. Since we can always get the width of the column with great certainty, it is more important to capture the depth of the column. Figure 2.2 shows how it is easier to get the depth. You will be able to square the corners again when you do Line Cleanup in the next section.
With free standing corners, you just have to do your best. Try to aim at the corner at a 45° angle before grabbing the /loc.
The World is Made of Lines
The bad news is the world is not made of corners. The good news is that the world is made of lines. All of the geometry in EQ2 is made up of triangles, the vertices of which are frequently easy to see. There is no point in capturing more than one point along a straight line, just grab the vertices and move on.

Figure 2.4 - Vertices in Poet's Palace (Click to Enlarge) |
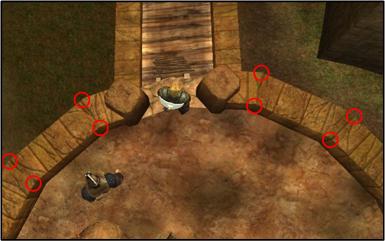
Figure 2.5 - Vertices in Deathefist Citadel (Click to Enlarge)
|
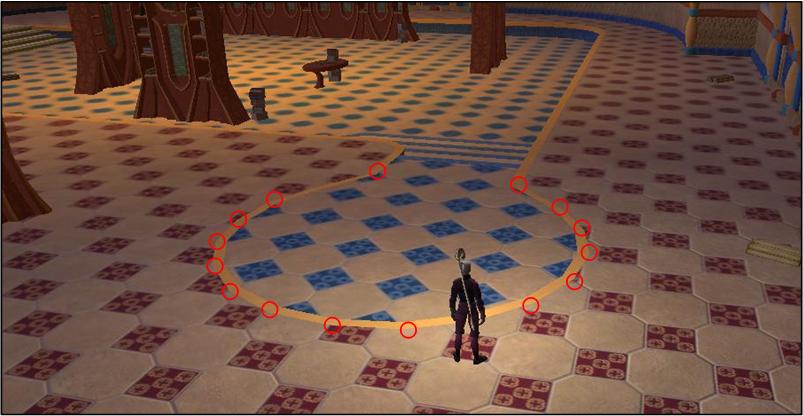
As you can see from these images, even the smoothest curves in the EQ2 world have distinct vertices. Rough walls do as well. Be economical as you gather coordinates, moving from vertex to vertex. If you are careful enough, you can easily replicate clean circles and other polygons.
Level of Detail
Another factor to take into account when gathering /locs is the overall size of the zone and the finished size of your map. In short, the larger the zone, the less detail you need and the less precise you need to be, because once you shrink down the map to fit, you will lose all of the fine detail.
A good example is the map for Sanctum of the Scaleborn (SoS). All of the corners and doors for SoS were very detailed and pointy. I spent a great deal of time capturing them accurately, only to have that detail washed away when resized to fit the map. Note that with the new mapping system it is possible to make larger maps, but even at twice the size, the fundamental issue remains. Don't collect detail you can't use.
That said, make sure you do capture as much detail as possible. Be sure to capture sunken areas and outlines of different floor or area textures. Some zones, like the Living Tombs, have important features like roads that do not have world geometry associated with them. In general, if there is a zone significant change in texture, you should try to capture its coordinates.
Do not capture all of the steps of stairs. Firstly, you'll never get them straight and secondly, you'd never remember which step you're on. Just capture the tops, bottoms, and sides of staircases. The remainder of the steps can be synthetically generated during the line cleanup phase.
If you have free run of the zone, try to capture the overall outline of the zone first, or grab a couple of rooms at the far extents first. This will give you a good feel for the scale of the zone. Then you can come back and fill in the details.
Consistency Is Key
Possibly the most important factor in creating a clean final map is consistency. When you are scouting the zone, make decisions about how you will capture things like door openings, bulwarks, and fancy corners. There may be 20+ doors in a zone with an identical style, or bulwarks every 10 feet along the wall. If you're going to capture them, you need to do so consistently and in a way that will enable you or your map maker to produce a clean map.
Don't be afraid to make a few test log files trying out different ways of representing a type of feature so you can do it quickly and reproducibly.
Preview Early, Preview Often
Even if you don't plan to create the final map, it is essential that you check your work as you go. Running a preview every few lines is always a good practice as it will give you a sense of scale as well an an opportunity to correct any errors you have made. You will also be able to quickly tell if you've missed any important details or if you accidentally left logging turned off (which sucks!).
Multiple Log Files vs. /em mapgroup
The question of if you should break a multi-level map into multiple files or use /em mapgroup to break the map into layers is tricky. The answer is yes, do both.
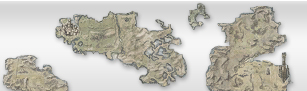
When you are initially capturing the /locs for the zone, it will be to your benefit to stop logging at the end of a level, make a backup of your log file, and delete the file. If you use a /em mapgroup, despite the levels being in separate layers in Inkscape, you will still see both levels every time you do a map preview. See this partial map from the Sanctum of Scaleborn, right. It can be very confusing to determine which lines belong to which level. Nor do you want to have to turn of the visibility on a layer every single time.
However, once you have completed your map and are working on cleaning up the lines, you will need the /em mapgroups to make it easy to work with separate levels individually. For a vertically stacked zone, you will likely recombine the separate log files so the scaling is consistent and the layers line up. More on this subject in Section 4, Line Cleanup.
Critical Point: When you make a new log file MAKE A BACKUP of the old one, and edit your preview batch file to have a new level number (line 4 in the batch file (click for image)). You do not want to overwrite an hour's worth of work with a new blank map.
Use of /em color
One of the features of Mapper2 is the ability to change the color of the lines you draw. The intention of this feature is not to produce colors that will be used in the final map, but to provide hints and reminders to you or your final mapper about the area and textures. For example, you could outline water in blue, or show a crack as brown. If there is a significant texture change you're capturing, you could use the color of the texture. See Figure 2.9 for an example.
If you do not plan on producing the final map of the zone, the color feature can be a great way to communicate to your final mapper what the zone looks like. However, use it in moderation. Don't use more than three or four colors or your map will look like a unicorn farted rainbows all over it.
Usage Notes
- When you use '/em color <color>' it changes the color of the current line, all the way back to the prior 'start new map line'. Each line can only be one color, so the last /em color command will be the color displayed.
- The color will remain for all subsequent lines until you change it to another color.
Log Cleanup
While you are mapping, life is happening around you. Monsters may be being killed, you may have a torrid love affair in going on in /tells, or someone in the raid is explaining that "mapping iz serious bidnezz". If you are going to share your log files, you'll want to clear all that out.
If you have been running an instant preview all along, you already have a clean log file in the zone subdirectory that you created when you set up your auto-preview. However, if you have not, you will want to run your log through the log_cleaner utility. See Figure 2.10 below for an example output.
- Start->Run (or Win-R), type 'cmd' and press enter
- From the command prompt, change directory to your mapper install by typing 'cd \maps'
- Change directory to where your zone files are stored with 'cd my_zone_folder'
- Run log_cleaner from the command prompt:
..\log_cleaner.exe <input_file.txt> <output_file.txt>
- Make sure your output filename is unique, so you don't overwrite an existing file.
Submitting your Logs to EQ2MAP
If you are not confident in your artistic skills you are welcome to post your log files for our more experienced mappers to turn into a map. If a map is created, your name should appear in the map credits. Messy, incomplete, or inadequately detailed log files may be ignored, so please do your best work.
- Go to maps.eq2interface.com (Hint: you are already there)
- Click the Forum button on the top menu
- Go to the EQ2MAP New maps sub forum
- Click the New Thread button
- Include the following information in the body of your message:
- Zone Name
- Map Style Name
- Color and Texture of the floor
- The zone this map is accessible from (IE: Commonlands, Antonica, etc.)
- Click the Manage Attachments button and attach your cleaned up log file or files. Do not copy/paste your log file into the message. This is messy and it breaks the log file.
- Optionally, attach an exported PNG image of each level of your map to show the quality of your collection work. See Section 4, Image Cleanup for a description of exporting your generated SVG file to a PNG Image.
- Optionally, attach high quality screenshots of zone textures and zone establishing shots. See Section 3, Screen Shot Collection for tips on collecting screenshots.
- Check back to answer any questions your mapper may have.


