Introduction
Testing is the last step you will do before your submission. If you have understood the previous sections, testing should go quickly. You will almost always need to make some minor corrections, but these should take a fairly short period of time.
Remember, your map will be going out to thousands of fellow EQ2MAP users. You don't want to send out a map with some minor oversight that will cause them to have to download the map again.
Before you Test
Before you fire up EQ2, here is a quick checklist of things you should make sure are in order.
- Place you map XML into 'UI\YourUI\eq2map2\_User_MapStyles.xml'
- Double Check heightmin/max pairs for adjacent levels
- Double Check availablerect and availablepriority values
- Check Map Style Names match up with your images
- Make sure your DDS images are in 'UI\YourUI\images\maps'
- Make sure you hid the blue crosses in your final image
Testing
Reloading your UI
If, during your test process, you have to make a change to any aspect of your map, be it in the _User_MapStyles.xml or in the .DDS image, you do not have to camp out of the game.
- Use the /loadui command to bring up your Load UI interface.
- Select "Default", then reselect your own UI.
- Click "Load UI". In just a few seconds your UI will reload, updating all maps and mapstyles. Note that the Mini-Map display will not update until you zone or switch to a new map layer.
For Each Map Layer
You will do the following testing for each map layer, assuming you have multiple maps.
Zonerect Verification and Tuning
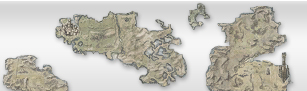
Open your map and zoom all the way in. Move to the furthest extents of your map for each compass point. When against the wall, facing parallel to the wall, your player icon should be almost exactly on the wall. If you are are against the wall, but your player icon shows as outside the wall, then the zonerect value for that axis is too small. If you are against the wall but your player icon shows you inside but not touching the wall, your zonerect value for that axis is too big.
Remember that the zonerect value represent the edges of the map, in world coordinate values. Thus, if your value is too small you will appear closer to the edge than you actually are, and vice versa. Mouse Over Figure 7.1 to see the relative position of the character marker vs. the edge of the map. Note that for each image the /loc of the character was identical, pressed up against the east wall.
Every time you change the value for the east wall, you must always recheck the west wall. The same is true for north and south changes. While a change to the east wall will be most noticeable at the east, there will still be some small change in the west. You may have to juggle east and west values a bit to make it line up.
After a few maps you'll start to get a feel for how far you need to adjust your values to make things fit. You should also note the the larger the map, the less noticeable an incorrect zonerect is. With a map the covers a very small area you may need to use decimal values in your zonerect to get it just right.
Check your Lows and Highs
If you have a multi-layer map, try to find the lowest and highest place in each level to ensure that you don't accidentally show an adjacent map if you jump off a statue or dip into a pool. For some zones it may not always be possible to have every area correct, so make a judgment call if it requires a subzone or if it's unlikely that the average player will run into the issue.
For Multi-Layer Maps
Check Vertical Transitions
Go up and down the stairs a couple times. Does your player marker move smoothly between the two layers? Do you run off the edge of the stairs before they change? Depending on how severe the difference is, you may need to adjust your map image(s), or you may just be able to fudge the heightmin/max. Remember, if you change a heightmin/max, be sure to adjust the corresponding min/max value in the adjacent layer.
Check Abutting Transitions
Verify that your Availablerect values are working correctly. Do you move smoothly from one area to the next, or do you run off the edge of the map. Does your map image correctly depict where your character marker will leave off that map and hit the adjacent map? Remember, if you change any of your availablerect values, you must change the corresponding value on the adjacent map section.
Verify Subzone Transitions
You should probably have already checked these when checking vertical and abutting transitions, but take special care to verify all of the edges of your subzones.
Check Drop Down Menus
Ensure that you can see each non-subzone map in the drop down menus.
After you Test
You're almost done! Don't relax yet though, you need to submit your map on the EQ2MAP forums! Don't forget to remove your map XML from _User_MapStyles.xml after you submit.