Introduction
Final Map Creation is the artistic part of mapping. You can make your map as utilitarian and drab, or as elaborate and colorful as you like. However, regardless of how you decorate your map, it must be both accurate and usable. This section will cover the technical aspects of the final map creation. We will cover the format of your final map, map size and line placement. We will also cover basic editing and texturing techniques, and discuss exporting your map so EQ2 can read it.
Image Editor
You can't make your map in MS Paint and expect it to turn out ok. At a minimum, you need an image editor that supports layers, has a "Magic Wand" type selection tool, and can export to DirectDraw Surface (DDS) format. Photoshop is best, if you have access to a copy, but there are lower cost alternatives such as Corel Paint Shop Pro. Paint.Net is free and easy to use, while the open source Gimp is more powerful and generally more difficult to use. The bottom line is use what you can afford and what you are comfortable using.
Final Map Size
The standard size for an EQ2MAP map is 436x506 pixels, using a standard parchment template (Found in the Tools portion of the Getting Started Section. For most maps, this is more than adequate. Your default assumption going in should be that you will use the standard map template linked to in the Getting Started section of this document. Note that if you have a map that is wider than it is tall you can rotate your canvas 90° for a better fit.
Until the new map system was introduced, EQ2MAP was set up so maps could only be the regulation size. This meant that many larger maps were split into two halves of regulation size. This artificial separation is no longer needed and it is now possible to make maps as large as 1600x1200px. However, very few maps would even come close to needing this type of resolution. You must choose your map size to fit the size and complexity of the zone you are mapping.
Map Size Guidelines
- When possible, use the standard 436x506 pixel map.
- Generally, hallways should be around 10px wide.
- For map sizes larger than 512x512, keep your minor dimension at 512 and scale the other to fit, as possible.
- For maps with a dimension larger than 512, new mappers should seek guidance from the EQ2MAP Team.
Maps larger then regulation size lacking complexity or failing to show sufficient artistic merit will not be accepted by the EQ2MAP team. The EQ2MAP team reserve the right to reject as unsuitable any map for any reason. New Mappers are encouraged to seek guidance on the EQ2MAP forums throughout their mapping process.
Editing Handling Basics
Non-Destructive Editing is Best
One of the key features of Photoshop and other high powered editors is the ability to make changes to your image without losing any data. You can blend colors and layers without altering the underlying data. This is a key concept to embrace as you begin to edit your map, because it enables you to fine tune your map as you create it. You can also correct mistakes or change your mind about certain elements of your map without altering or having to redo other elements you like.
Layers are our friends
By far, the most powerful tool in the modern image editor are layers. You will use layers to build up your lines and textures up like an elaborate cake, each layer separate and separately editable. Moreover, you can use layer masking effects to blend or fade portions of the map. In multi-level zones, you can group your layers to show the next level using the same art you used to depict that level. The bottom most layer will be the parchment template.
Layer Sets or Layer Folders
Starting with Photoshop 6 or so, Photoshop has included a feature called Layer Sets. Layer sets, symbolized by a folder icon at the bottom of the Layers Pallet, allow you to act on all of the layers contained within them. You can place layers into a layer set by dragging and dropping. Once you have layers in the set, you can select the layer set and move it, change its opacity or mixing, or apply layer masks. Layer Sets are a great alternative to flattening your layers because they allow you to achieve the same effects without losing any data.
Basic Map Creation
This section covers the making the most basic possible map. It also touches briefly on on more advanced techniques for adding textures and shadows. All shortcuts listed are for Photoshop.
Placing your lines
Open up your map template and save it as a new file with a map specific name. Open the .PNG file (or Place your EPS file) you exported from Inkscape which contains your lines. Select everything from the .PNG except the text at the top and bottom of the file. Make sure you have the blue cross hairs, as they will be critical in creating your ZoneRect. Copy your selection.
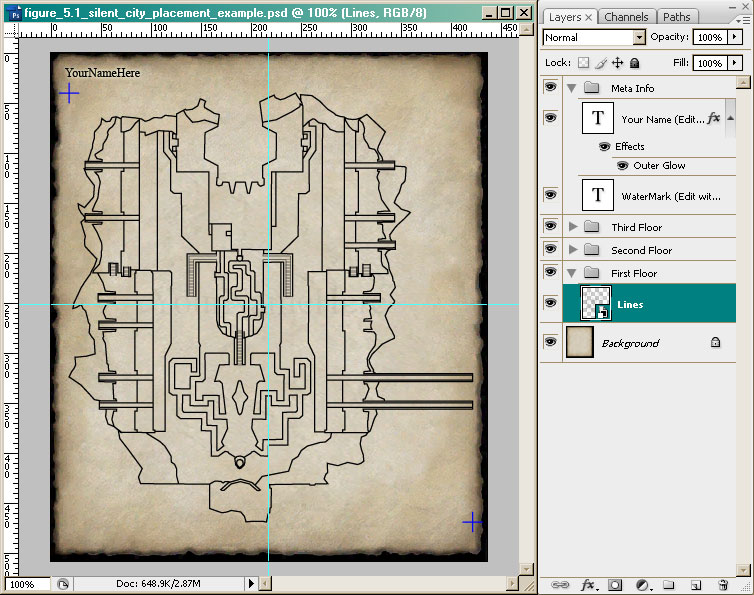
Paste the lines into a new layer in your template file. Transform (Ctrl-T) the layer and resize it proportionally (hold down shift as you drag the corner) until it fits into the template. The blue cross hairs represent the upper-leftmost and lower-rightmost extents of your map, so they should be just inside the parchment edge. The map should be centered and fill the available area as best as possible. Double-click to complete the transformation.
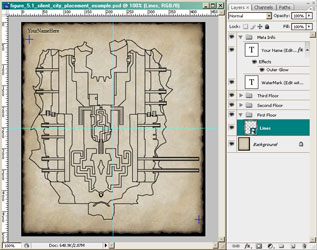
Figure 5.1 - Line Placement Example
(Click to Enlarge) |
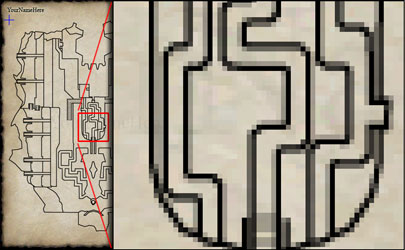
Figure 5.2 - Line Anti-Aliasing
(Click to Enlarge) |
Color Under The Lines
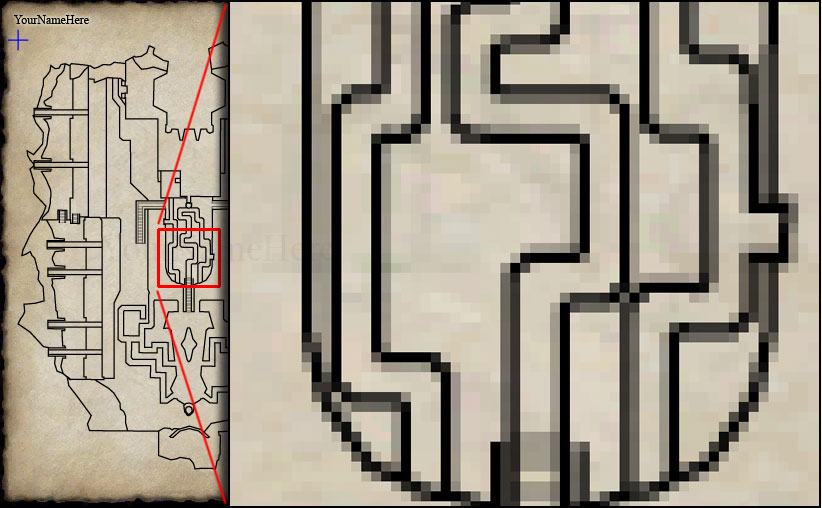
Now what we have is like a grand coloring book. A key difference is that rather than coloring inside the lines, we're going to color under the lines. When we resized the map from its full export size of 1500+ pixels, down to our more modest map width, the lines retained much of their smoothness. This is because our image editor is using Anti-Aliasing to smooth out the lines. See Figure 5.2 for an example of anti-aliasing. This is great for maintaining the look of the lines, which are actually much better than if we had exported them at our native resolution. Inkscape does not do anti-aliasing, so the exported lines have "the jaggies".
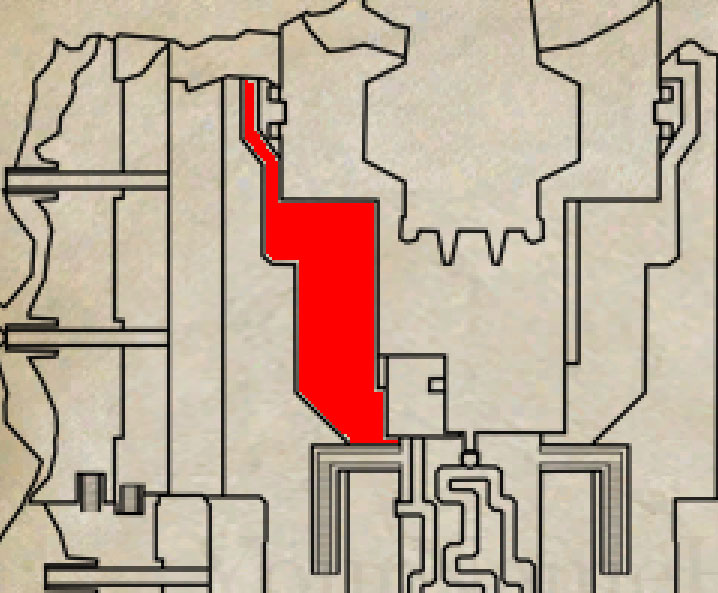
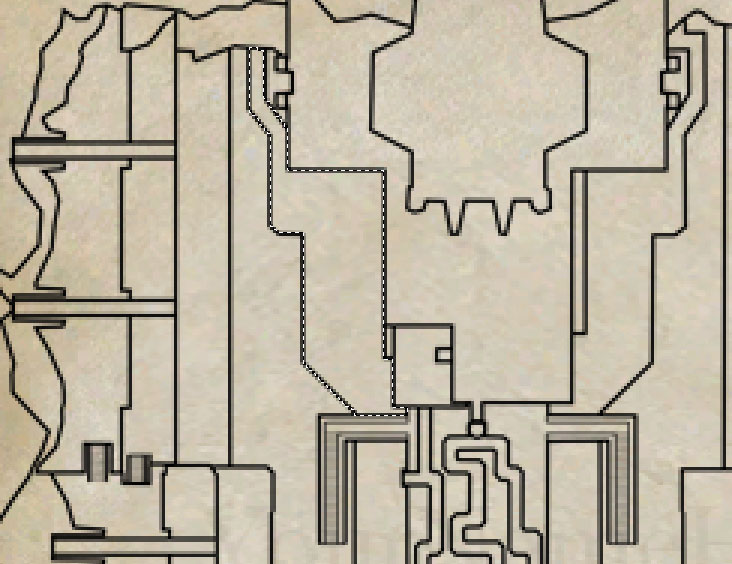
The disadvantage of anti-aliased lines is that when we use them as guides, they leave anti-aliasing cruft on around the edges of areas. See Figure 5.3 for an example. We will regularly use the Magic Wand to select the spaces between lines that we wish to color, then fill them in on another layer. To avoid the anti-aliasing cruft, we can select the area, then expand the selection (Selection->Modify->Expand) by one pixel. Figure 5.4, which is hard to see in the small version, shows an expanded selection that will be under the line when used on another layer.

Figure 5.3 - Anti-Aliasing Cruft
(Click to Enlarge) |
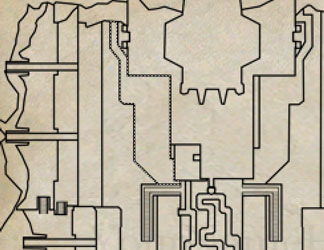
Figure 5.4 - Cutting Object
(Click to Enlarge) |
Basic Texturing
The easiest textures to use are those with a simple, square, repeating pattern, like tiles or blocks. These simple textures can be used, with minor correcting and scaling, almost directly from a screenshot. You will always have to correct for perspective to square up the tiles. The larger and more complex the tile, the more difficult it can be to get it to line up properly when repeated. However, the principles remain the same: Cut from the screenshot, square up, and scale down.
Note that it is not critical that you scale the tile to exactly match the scale of the level. In most cases this would result in a repeating tile being only a few pixels wide and unrecognizable. Usually, just getting the texture in place with the right coloration captures the essence of the level. The only time it may be critical for a pattern to match the scale of the level is when the pattern is very distinctive, such as in Poet's Palace. In some cases you may need to manually recreate the texture by hand using the principle colors of that texture.
Texture Preparation
Using the Entrance for The Silent City, we will step through the process of preparing a texture for use. Follow along with the steps with Figure 5.5, mouse over to animate, click for full size animation.
- Open your texture screenshot
- Use the "Polygonal Lasso" or equivalent tool to select a "square" section of your texture.
- Cut the texture and paste it on a layer by itself. You can turn off the source layer.
- Place guide lines in a square with sides the same length as the bottom of your selected section of texture.
- Free Transform (Ctrl-T) your texture, pulling the corners out (Ctrl-Drag the corners) until the texture itself matches up with the square.
- Free Transform (Ctrl-T) your texture again, now proportionally shrink it until it is a reasonable size.
Figure 5.5 - Texture Preparation
(Mouse Over to Animate, Click to Enlarge Animation) |
Figure 5.6 - Texture Placement and Masking
(Mouse Over to Animate, Click to Enlarge Animation) |
Texture Placement and Masking
Now we will place the texture and mask (or trim to) the displayed area. Follow along with the steps with Figure 5.6, mouse over to animate, click for full size animation.
- Copy your shrunken texture from Texture Preparation and paste it into its own layer, under your lines.
- Paste another copy, taking care to line it up with the existing texture, then Merge down the layer (Ctrl-E).
- You can now copy the entire newly merged layer and paste it in, again lining it up with the already placed texture block. Merge it down (Ctrl-E).
- Continue to place and merge down the texture until you have covered the entire area that will contain it.
- Change Layer to your Lines layer, use the Magic Wand to select the area that will contain the texture. Expand that selection by 1 pixel (Selection->Modify->Expand).
- Reselect the texture layer. Apply the selection as a layer mask, showing the area selected (Layer->Layer Mask->Reveal Selection). Alternatively, rather than use the layer mask (or if your image editor does not support them), you can also invert your selection (Ctrl-Shift-I) and press delete, removing everything that does not fit into your selected area.
- Unlink the layer mask by clicking the little chain link between the image and the mask, in the layer pallet.
- Now you can align the texture with the movement tool without affecting the mask or any other part of the image. This, of course, will not work if you have instead deleted the unused sections.
Advanced Texturing
Not all zones have clearly defined edges to their textures. The dirt floor of the castle keep in Deathfist Citadel consists of a grassy texture over dirt. In The Silent City there is dirt around the edges of the tile area. Rather than attempt to clinically trace out the extents of the dirt, we can instead artistically recreate the dirt over the tiles.
It may not always be possible to get a texture screenshot with uniform lighting. When you attempt to tile the texture your edges will not match up. However, there is a simple solution: When you paste your tile horizontally, flip it horizontally. When you paste it vertically, flip it vertically. By doing this you are guaranteed to have a matching edge because it is the exact same edge as you are matching.
Advanced Texture Placement and Masking
Texture preparation is similar to with a simple texture, although if the source texture is not a tile, you need not correct for perspective. You can see the video as figure 5.7, press play to view.
- Paste your dirt texture on a layer above your tile.
- Paste a copy, then flip it horizontally. Merge that layer down (Ctrl-E).
- Copy the combined texture and paste it, then flip vertically and align it above the placed texture. Merge down.
- Now you can copy and paste the 4x texture vertically and horizontally until, as with the basic texture, it covers the area you wish to cover. Merge your dirt texture layers into a single layer.
- On your Lines layer, select your area to texture and expand the selection by 1 pixel.
- Select the dirt texture layer and create a layer mask from the selection, or invert your selection and delete the areas you don't wish to see.
- Unlink the layer mask.
- Using the Brush tool, choose a fairly large and very soft edged brush and the color black. You can optionally reduce the flow of the brush, which will "erase" slower. Multiple passes of the brush will be required to remove all of the texture.
- With the Layer Mask selected, draw on the mask with the brush "erase" away the center portions of the dirt texture. If you make an error, you can use white to draw the texture back in. Choose a smaller brush to add in details to the edges of the dirt. In this way we can non-destructively create a fuzzy blend of the two textures.
- If you are not using a layer mask, you can use a soft edged eraser and simply erase the portions of the the texture you do not want.
Adding a Shadow Layer
Most maps use a shadow to offset the map from the parchment. In order to do this we will create a layer that matches the overall shape of the layer and then apply a layer effect. This example is, of necessity, very Photoshop Specific. It is possible to do drop shadows in other programs, via plug-ins, or by applying filters.
- At the bottom of your layers, create a new empty layer, call it Shadow Mask.
- On your Lines Layer, use the magic wand tool to select the outside of the lines, the negative outline of the level. Be sure to shift-click any inside non-map areas to add them to the selection. Expand your selection by 1 pixel.
- Invert your selection (Ctrl-Shift-I).
- Select your Shadow Mask layer and using the paint bucket tool, fill the selection with a neutral color. This color shouldn't matter, since it should be covered by textures, but I always choose a parchment mid tone.
- Apply a "Drop Shadow" Layer Effect to the Shadow Mask layer. Adjust settings to taste.
Adding Shadows
If you have a map with a lot of open area, it can end up looking very flat and two dimensional. One way to add depth to your map is to add shadows on top of the textures. This should be one of the last things that you do to your map, so you can see the full effect. See Figures 5.8 and 5.9 for a before and after picture.
Before you add shadows, you should determine where the light will be coming from. I personally always use a light from the upper right, which casts shadows to the lower left. You should also take a moment to review your screenshots to remember the height differences in the level. The higher the area, the longer the shadow extends.
- Create a new layer just underneath your Lines layer, called Shadows
- Set the opacity for the Shadows layer at 50%. You can adjust this later to darken/lighten your shadows.
- Select your Lines layer and, with the Magic Wand tool, select the tops of all of the highest areas in the map.
- Switch back to the Shadows layer. Expand your selection by 1 pixel and invert it (Ctrl-Shift-I).
- Select a medium size, soft edged brush and the color black.
- Paint on the Shadows layer where your shadows will be. The inverted selection will keep you from painting on the top of your tall areas, so you can ease the brush out.
- Remember that your shadows will all be to the lower left of your tall areas.
- Repeat the process from step 3 on, selecting the next highest areas and working your way down.
- Adjust the opacity of the Shadow layer to taste. You can also experiment with alternate blending modes to achieve different effects.
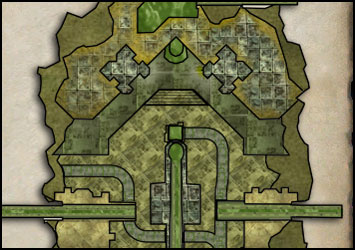
Figure 5.8 - Without Shadows
|

Figure 5.9 - With Shadows
|
Map Layering and Transitions
If you have a multi-layer map, you should give some thought as to how you wish to depict the additional layers and the transitions between them. It is common to show levels below your current level as half transparent, or dimmed, unless there is a common area which you can see through, IE: a giant cavern or a hole in the floor. If there are stairways leading down, they should fade match to the opacity of the lower layer.
Simple Fades with the Gradient Tool
The easiest way to get a clean fade is to use the linear gradient tool on a layer mask.
- Apply a Layer Mask to your level's Folder. This is the folder which contains all of the layers making up a single level. If your editor does not support folders, make a BACKUP of your map and flatten all the layers except the parchment. DO NOT save over your unflattened map.
- Unlink the layer mask from the folder/flattened map and select it.
- Select the Gradient Tool with a simple "Foreground to Background" colors and a Linear gradient.
- If you are fading out completely, put your foreground color to black. If you are fading partially, choose a color like a 50% gray. The background should be white.
- Use the rectangular selection tool to select just the portion around the stairway you wish to fade.
- Drag the gradient tool inside the selection. The shorter you make the line, the harder the transition will be. You will probably have to play with the gradient positioning and length to get it right. You can also use a soft brush on the layer mask to touch up your fade.
Dealing with Levels/Layers
If you have to flatten your layers to change their opacity, or to apply fades, it may make sense to make several copies of your final level file, one for each flattened layer and one which combines them all. You can then mix them and save off your final map. If you do this, make sure to keep logical filenames so you don't overwrite something important.
With your final big file, you can change the opacity of each level, arrange their order, apply fades, or toggle their display, in order to generate each individual level's view.
Remember that it is more important that your map is useable than pretty. Do not display lower levels if they will detract from the usability or understanding of the map.
Preparing to Test
With our map finalized, there are only a few things left to do: get the extents coordinates, export the image as a DDS, and save a display copy as a JPG.
Map Filenames
The standard for map files names is:
map_<map style_name>[_<map_number>].dds
Examples
map_exp01_dun_living_tombs_0.dds
map_exp01_dun_living_tombs_1.dds
map_runnyeye.dds
Coordinate Grabbing
The blue crosses which we have kept sitting off in the corners of our map will now finally be used. We must collect the coordinates, in pixels, of the center of the crosses in the upper left most corner and lower right most corner.
The easiest way to do this is zoom in on a cross, select a fine point tool and use the display in the Info window (Windows->Info) to determine the coordinates of the center of the cross. Note that the cross is probably 2 pixels wide, so just do your best guess. We will adjust this later. You may need to change the display to pixels (Edit->Preferences->Units & Rulers).
Make a note of the coordinates, as they will be used to calculate the ZoneRect. Now you can either mask out or erase the crosses.
DDS Creation
EQ2 uses a special type of image file for in-game textures, which includes maps. This file type is a DirectDraw Surface, or DDS file type, which contains special texture specific information. Few image editors read or write this file type by default, so you must typically install some sort of plug-in or add-on to enable it.
The Getting Started section links to the Photoshop plug-in. Installing this plug-in gives you the option to "Save As" a .DDS file.
Remember that as a limitation of the DDS file type, your image must have dimensions that are a multiple of four. Note that it is not critical that you have useful information in your whole image - you will restrict the amount displayed by adjusting your SourceRect (see next section for details).
There are two critical settings you must use when saving your DDS file.
- DXT1 ARGB (4 bpp | 1 bit alpha)
This is the format of data that will be saved, with a simple alpha (transparency) mask.
- No MIP Maps
MIP Maps are downsized versions of the texture that are used when displaying geometry that is far away. The map display does not use these and they add significantly to the size of your .DDS file. Make sure that your final .DDS file size is similar to that of other maps with the same dimensions.
JPEG Creation
The EQ2MAP web site uses the JPG format to display your map. Save "For Web & Devices" a copy of your map in the JPG format.
Use the Average (6) Quality. There is no need for a high quality JPG.
Sample Photoshop Map
Provided for your enjoyment, here is a copy of the final Photoshop .PSD file for the East section of The Silent City.
Download Silent City Eastern Section
This file contains all of the final layers, layers masks, shadow layer, and shadows as they appeared in the final map.