Introduction
No matter how skillfully you collect your coordinates you will have to take time to clean up your lines. You will have crooked lines, wacky looking doors and buttresses, extra points, missed points, and more. The time you take to clean up your map will also enable you to create or recreate in-game geometry which is difficult or tedious to capture in-game, such as stairs, circles, and regular polygons. Finally, you will be able to easily change the weight and color of your lines to emphasize or de emphasize map features prior to your final map creation.
Vector Graphics Editor
This document is written with Inkscape in mind for your Vector Graphics editor. Inkscape in an Open Source Scaleable Vector Graphics (SVG) editor, free to download and use. While all of the examples list Inkscape hotkeys and tools, the concepts are the same across other editors. You are welcome to use Adobe Illustrator or any other SVG compatible vector editor you are familiar with.
Before You Start Editing
There are several things you will need to do before you begin editing. Multi-Layer zones may need to be combined, you may need to manually run Mapper2, and you should save off your SVG file as a copy prior to editing.
Multi-Layer Zones
If you are working on a multi-layer zone where it is important that the layers are vertically aligned, stack properly, or are visible through one another, you will need to combine your log files together and run the composite file through Mapper2. One of the functions that Mapper2 provides is auto-scaling and auto-centering of the lines within the current log file. Since the maximum extents of each level may vary significantly, log files run separately will have different scaling factors and alignment.
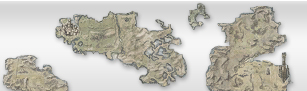
Figure 4.1 shows combinations of the ground and top floors of Deathfist Citadel. In the left image, the log files were run through mapper one at a time and superimposed on one another. You can see in the corners and sides how the bottom floor is slightly larger than it should be in comparison to the top floor. The right side shows the same log files, combined and run through together.
Combining Layers
To combine your files, create a new blank text file in Notepad or your favorite text editor. Do not use Microsoft Word or other WYSIWYG Document editors, since you are dealing with raw text. See the Introduction to Section 6, EQ2MAP Integration, for a discussion of advanced text editors.
Open each of your log files and cut and paste them into the new text file, one after the other. If you have not already created mapgroup entries, after each log file, on its own line, put " mapgroup". Note the preceding space, which is needed for Mapper2 to pick it up as a command.
Running Mapper Manually
If you have combined log files, edited them manually, or simply need to recreate an SVG file from a log without using the instant preview batch file, here is how you do it:
- Start->Run (or Win-R), type 'cmd' and press enter
- From the command prompt, change directory to your mapper install by typing 'cd \maps'
- Change directory to where your zone files are stored with 'cd my_map_folder'
- Run Mapper2 from the command prompt:
..\mapper2 <input_logfile.txt> <output_filename.svg>
- Make sure your output filename is unique, so you don't overwrite an existing file.
Save your SVG File
Before you start editing your SVG file, to save it off under a new filename not used by your instant preview. This will ensure that you don't accidentally overwrite all the work you are about to do.
Line Cleanup
Layers (Ctrl-Shift-L)
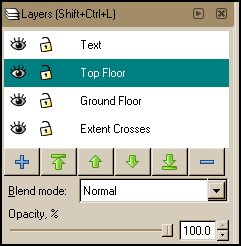
Every SVG file produced by Mapper2 has at least 3 layers. One for the text at the top and bottom of the document, one for the cross hairs, and one for the current level. Any mapgroups you have created will appear as separate layers.
The Inkscape layers interface (Ctrl-Shift-L) allows you to select layers, rearrange them, toggle their visibility, and lock them to prevent editing. Under normal editing conditions, clicking on an object in a layer other than the active layer will select that object's layer. You should lock or turn off the visibility of layers you are not working on.
Node Editing Tool (F2)
The Node editing tool is your bread and butter for editing lines. You can select an object and press F2 and you will enter node editing mode. The Node edit tool makes it easy to move, add, and delete nodes and groups of nodes.
You can select multiple nodes either by clicking on the connecting line, or by shift-clicking individual nodes. You can also drag a selection window with the Node Edit tool, grabbing every node inside. Nodes can be nudged with the arrow keys, or moved 1 unit at a time by holding down alt and using the arrow keys. Many times the easiest way to ease a node into place is to use the alt-arrow keys. A new node can be inserted by double clicking on a line at the point you want the node added.
You can constrain your node movement in two different ways:
- Hold the Ctrl key when you drag a node it will only move straight up/down or left/right.
- Hold both Ctrl and Alt and you can extend the node along the path of either connecting line.
This mode can be helpful for extending a line into a corner you couldn't reach in-game. If you dropped a point against the wall, you can simply extend it out until the corner it is square.
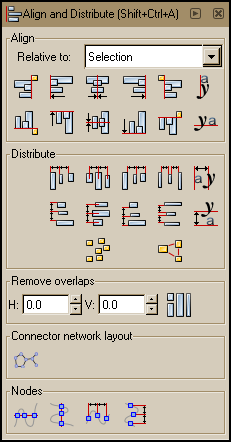
Align, Distribute, and Node Alignment Tools (Shift-Ctrl-A)
The Align and Distribute pallet is very useful for a number of map making tasks.
Easy Stairs with Align and Distribute
- Make a straight line the width of your stairway at the start of your stairway.
- Make a copy of that line and place it at the end of your stairs.
- Duplicate (Ctrl-D) one of the lines as many times as you need for steps.
- Drag a selection rectangle to get both ends of the stairs and the duplicated lines.
- Use the Distribute->Centers command either vertically or horizontally to distribute the steps evenly. Use Align->Center to make sure they are centered in the staircase.
- If you have too many stairs, delete some of the lines and redistribute them. Too few, just duplicate a few lines and redistribute. The top and bottom (or left and right) most lines will determine the extent of the staircase.
Line Cleanup with the Node Alignment Tool
By far, the tool I used most is the Nodes section of the Align and Distribute tab. You can force a number of selected nodes to be aligned either vertically or horizontally. By choosing inside corners to align with, I can straighten out bulkheads and align nodes across halls. I can also flatten walls and even out ends of buttresses.
The key to the node alignment tool is knowing that the last node selected will act as the anchor point for the row. Either use Shift-Click to select individual nodes, or drag a selection box over a whole row and then shift-double-click (unselect, reselect) the node you wish to align to, then click the appropriate node alignment button.
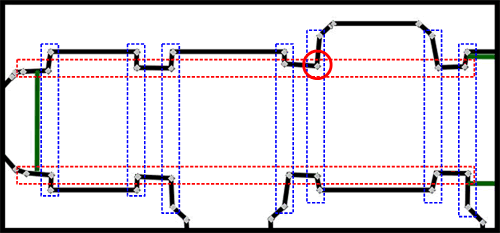
Hallway Cleanup Example
See Figures 4.6 below to follow along with the following example, mouse over Figure 4.6 to Animate:
- The top rows of nodes in the red box can be selected, then the node circled in red, which is furthest into the hallway, can be de/re selected to make it the controlling node.
- Click Align Nodes Horizontally.
- Repeat the process with the lower row of nodes in the red box, choosing the left most node as the controlling node. Align Horizontally.
- Now, move down the rows of nodes in blue, selecting each row in turn and using either the top or bottom inside corner as the controlling node. It shouldn't matter which one, since they should be identical in terms of left to right alignment.
- Click Align Nodes Vertically for each selection.
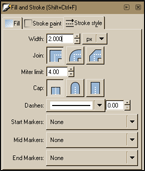
Line Style (Ctrl-Shift-F)
The Line Stlye Pallet has several tabs which allow you to change the color, fill, and style of a line. By default, Mapper2 makes all lines have a weight of 2. While this is acceptable for the edge of the map, all internal lines, especially stairs and edges of textures should have a weight of 1.
Break, Combine, and Join Lines
Break Line at Point (Shift-B)
While you are editing, it may become necessary to break a line into pieces. To break a line into pieces, select a point on the line and press Shift-B. You can then move, delete, or edit that portion of the line. As mentioned in the Node Editing section above, you can double click with the node tool to add a node, then break the line at that point.
Join Points (Shift-J)
Select two points and press Shift-J to join them into a single point. Sometimes useful for closing loops or creating smooth lines.
Combine Paths (Ctrl-K)
In order to make node editing easier, it is sometimes useful to combine two separate lines. Select both lines and press Ctrl-K. Note that this may alter the fill and stroke of the new line, so you will need to reset them to no fill and solid line in the Line Style Pallet.
Break Apart Paths (Shift-Ctrl-K)
The opposite effect of Combine Paths, any unconnected path will be broken into a separate object. Break the path at a point (Shift-B) and then break the path into two separate objects (Shift-Ctrl-K).
Synthetic Geometry
The world is not only made of lines, the world is made of regular geometric shapes. We can use this to our advantage by using Inkscape to completely replace lines or areas captured in-game with vector perfect polygons and circles. We can also use regular polygons as guides for straightening and fixing hard to capture in-game geometry. Finally, if we've cleaned up an area which is used elsewhere in the zone, we can just cut and paste our cleaned areas over the captured areas.
Geometry Replacement
Sometimes the best way to clean up a line is to replace it. Inkscape is capable of producing much smoother curves and cleaner squares than the world geometry allows. Simply create a circle or square of the right size and just use the captured geometry as a guide for placement.
The Princess Court of the Living Tombs has two circular catch basins. In Figure 4.8 you can see the difference between my captured geometry and the clean, concentric circles I was able to produce in Inkscape.
I frequently replace square or rectangular columns (all outside corners) with a vector square from Inkspace.
Geometry Creation
As demonstrated at the end of Section 3, you can fill in uncaptured geometry by using visual references. As shown above in the Align and Distribute section, it is possible and, in fact, preferable to create stairs during this phase.
For the Temple of Ro, in Lavastorm, there were symmetrical columns along all of the hallways. They were very difficult to capture due to their size and shape. After a while, rather than capture them all, I instead captured one side of the hallway. When I did line cleanup I replaced all of my drawn columns with filled in squares and duplicated them across the hallways. See Figure 4.9 below for the before and after images.
Geometry as Guide
Sony's Mappers are fond of making rooms and features which are regular polygons. Unfortunately, they are also fond of putting statues and columns at the points of these regular polygons, making it difficult to capture them cleanly. If you can determine the underlying shape, you can use use Inkscape to create one and use it as a guide.
To create a guide, determine the shape and orientation, and draw it over existing walls. If you've captured your walls correctly, they should be correct, just their ends will be off, so make sure the shape lines up with your existing geometry. Change the guide's color and line style to be thicker and a contrasting color, then put the shape on another layer which you can lock. See Figure 4.10 to the right, mouse over to see the fixed lines. A nine sided regular polygon is called a nonagon. A similar technique was used in the Temple of Ro example above to clean up the decagonal room in the upper right.
Cut and Paste Geometry
Many areas feature mirror image identical rooms or areas. Once you have spent the time to clean up one of the rooms, there is no reason not to cut and paste that room over. You may want to Group (Ctrl-G) your lines before you copy and paste to make it easier to move the pasted item. You can use the Duplicate (Ctrl-D), Flip Horizontal (H), and Flip Vertical (V) commands to quickly duplicate and mirror your selected geometry. Mouse Over Figure 4.11 for a small animated demonstration.
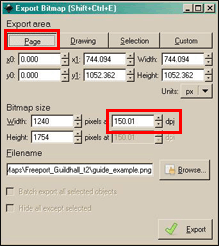
Exporting
Once you have completed cleaning up your lines, the last thing you will do is export your finalized drawing SVG as a PNG file, for use in your final map image.
There are only two important settings on the export window. Choose "Page" as the export area, and between 150 and 200 DPI. This will give you a consistent, high resolution size. In general, you want your final export width to be at least twice and as much as three time the size of your final map width. When it is scaled down you will get a much finer line than if you were to export at the native resolution.
Alternatively, you may also save a copy of the file as an Encapsulated Post Script (EPS) file. This can be done by changing the file type in the File->Save As dialog. Assuming you have an image editor capable of supporting it, EPS has the advantage of being infinitely scaleable in your bitmap editor. This may not ultimately be useful, since you will likely need to rasterize your lines anyway.
Learn More About Inkscape
Inkscape is fully documented, has good in-program help, and there are a number of detailed tutorials available online.
References