Introduction
This section will cover getting and installing all of the tools and files that you will need to generate your map. We will cover locating and organizing your files and directories to keep everything neat as you work your way through the map making process. We will cover setting up Mapper2 and Inkscape to create an Instant Preview. Finally, we will cover EQ2 settings and macros to get you ready to map.
Folders and File Organization
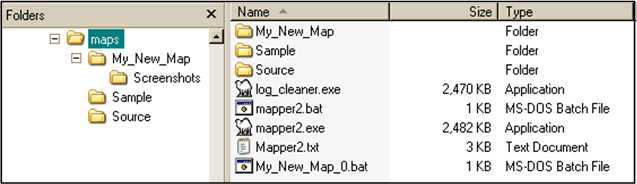
Due to the number of different types of files that we use, it is important to organize your files. I strongly suggest you create a \maps\ folder in the root of your C:\ drive. This is where you will install Mapper2 and keep your batch files. For each new map that you make, create a sub folder (IE: My_New_Map in the figure above). You can also create a subfolder of that folder for storing the screenshots you take for that map.
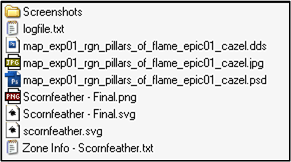
Name your files consistently. Even a simple map can generate a large number of files of different types. Once you get to multi-level maps, you may be talking about 30+ files. I suggest naming files after the Map Style Name (more on this later). At very least you will have, per map level:
- The cleaned log file of your /locs
- The generated SVG file
- The PNG export of the SVG file, from Inkscape
- The PSD Photoshop file of the final map
- The DDS export of the final map
- The JPG export of the final map
Tools
There are a number of user created and open source tools that we will use in the creation of maps. Here are the tools that I use and for which this guide is written. Take a moment to download and install these tools.
Inkscape is an open Source Scaleable Vector Graphics (SVG) Editor. We will use this to view and edit the output from the Mapper2 tool.
Install this tool with the default options.
Mapper2 is a stand alone executable which parses a eq2log.txt file and creates an SVG file.
Unzip this file to the root of your C:\ drive. It will create a directory called "maps". This is where you will store all of your map files.
Taco-Man's indispensable ZoneRect Calculator tool. I have used this for all of my maps.
Unzip this file into your C:\maps directory.
The Photoshop DDS plug-in will enable Photoshop to save and open .DDS files, the format which EQ2 needs the final map to be in.
Install this tool with the default options and it will put itself in your Photoshop plug-ins directory. If you are not using Photoshop, do a search for "DDS" and your image editor.
The standard faux parchment map template, 436x508px. Unzip a copy into your C:\maps directory.
Setting up Instant Preview
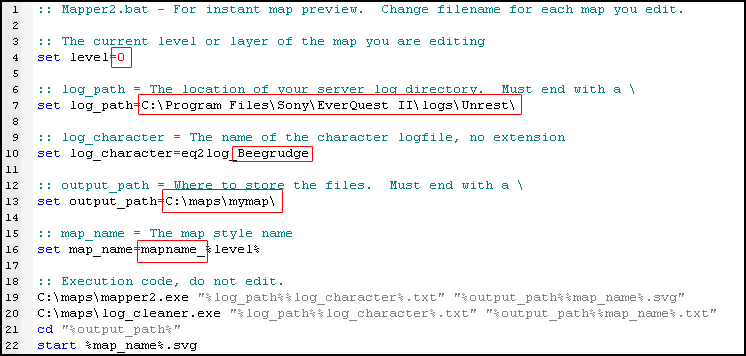
Even if you are just collecting coordinates for a map, it is very useful to set up for instant preview. Provided with the Mapper2 installation is a batch file which can be configured to automatically display your current log file in Inkscape.
- Make a subdirectory in your c:\maps folder for the map you will be creating.
- Make a copy of mapper2.bat in the c:\maps directory for each map level, named after the map you will be working on.
- Edit each file by right-clicking and selecting Edit.
- Figure 1.3 shows the fields that you need to edit:
- level: The level of the map you're creating - match this to the filename of the batch file.
- log_path:The path to your EQ2 install directory logs\server folder
- log_character: The name of your character's eq2log file
- output_path: The location where the .svg file will be created and a backup copy of the log file will be copied. This should be the same folder you created previously under file and folder orginization.
- map_name: The Map Style name, or whatever you want the map filename to be.
- Make a shortcut to the new batch file on your desktop, quick launch bar, or convenient toolbar.
- Run EQ2 in Windowed Mode. Now you can launch a preview of the map by clicking the shortcut.
EQ2 Commands and Macros
EQ2 Commands
There are two commands we will use with EQ2 to set it up for map capture. Be sure to run these commands before you start mapping
- /show_map_style_name 1
This command tells EQ2 to display the Map Style Name when you zone into a new area. The Map Style Name is the internal name that EQ2 uses to refer to each zone and is what we will name our map files.
- /log
Turning on logging is critical to the mapping process. It is by parsing the log that we will get all of the zone data.
EQ2 Macros
The Mapper2 tool uses /em emotes for control. You should set up macros for each of these emotes in the Socials ('o') menu and place them on your hotbar.
- /em start new map line
This command tells Mapper2 to "lift the pen" so you can begin drawing a new line. More about this in the next section
- /loc
By drawling lines between each /loc, we can determine the outline of the map.
Optional Macros
These commands are optional and you may decide not to use them after learning more about them in the next section.
- /em mapgroup
Starts a new layer in the output file. Useful for the final output in multi-level maps.
- /em color <color>
Where <color> is a standard color name, e.g. blue, black, green, etc. This changes the current an all subsequent lines to the given color. You can find a full list of acceptable color names here:
SVG Color Names.
If you plan to use colors, you should always create a macro for /em color black to reset the color to black.